Gameplay
Basic movement
Your Combo Bar shows many pieces of information
If you press the key for the 5th slot and no weapon is assigned to it, kick will be used
To remove a weapon from a slot, right click it and it will go back into your inventory
Attack Combos
Menu Buttons

Your inventory starts out with 32 slots and can be expanded (See Items section below)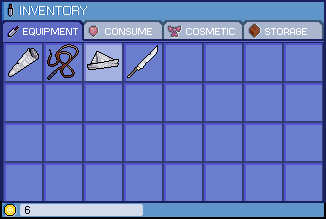
This is where all of your items you obtain go, and has 4 tabs storing their respective item types
To equip a hat or to add a weapon to your Combo Bar, right click it
In-Game Chat
The game's chat area is located in the top left of the game's window under your health and stamina bars
Press Enter to be able to enter in text into the chat and press Enter to send that text
There are two options for your chat input's destination
There are small indicators on the left side of each message that depict the time since that message was sent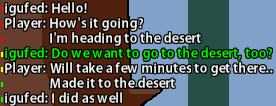
Chat Commands
Commands can be entered into the chat to do various things
Commands start with a forward slash (/)
Try it by typing "/help" into the chat without the quotes
Item Claim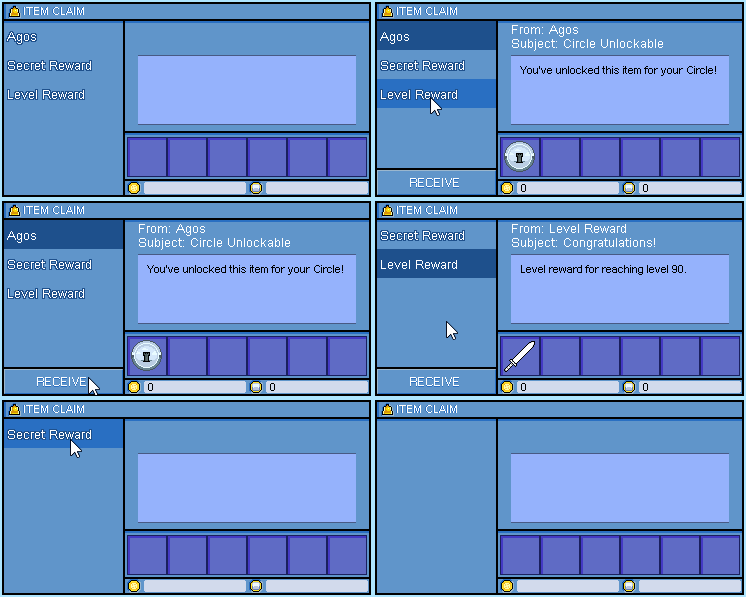
Item Claim is a place where rewards from various milestones/events/unlocks are sent to
You will be notified in-game if a new claim is available to you
Basic movement
- Left and right arrow keys are used to move their respective direction
- 'A' key is used to jump
- Down arrow is used to crouch while standing still
- Lowers your hitbox slightly
- Jumping while crouching lets you jump higher
- Left-shift key uses your DART skill
- Quickly moves the direction you are facing for a short distance
- Can be used while in the air
- 'X' key is used to sit
- Regenerates health
- Regenerates stamina at double the rate
Your Combo Bar shows many pieces of information

- Equipped weapons
- Any active weapon cooldowns
- Key used for each weapon
- Active combos
- Active cooldown for your DART skill
- Your active potion and any associated cooldowns with it
If you press the key for the 5th slot and no weapon is assigned to it, kick will be used
To remove a weapon from a slot, right click it and it will go back into your inventory
Attack Combos
- Combos are pre-set combinations of attacks done in succession within a time frame
- You have 5 seconds in between each attack of the combo to finish it, or it resets
- If you successfully complete a combo, large text with the combo's name will be displayed at the top center of your game window
- The effect of a successful combo will be one or both of two pre-set results
- More damage on final attack
- Some stamina returned to you

Menu Buttons

- Stats (hotkey 'T')
- Inventory (hotkey 'I')
- Abilities
- ACTs
- Item Claim
- Collection
- Log Book
- Settings Display
- Sound setting (toggle with '/sound' command in chat)
- Below Sound is time since last server packet, if you see yellow or red, you may have disconnected or will soon
- Current ping
- Current server XP rate
- Current server drop rate
- Current server respawn rate
- Current server attack speed
- Current server cooldowns
- Current FPS

Your inventory starts out with 32 slots and can be expanded (See Items section below)

This is where all of your items you obtain go, and has 4 tabs storing their respective item types
- Equipment, stores weapons and hats
- Consume, stores items that are consumbed on use
- Cosmetic, stores learned cosmetics
- Storage, stores weapons, hats, consumables that have been stored
To equip a hat or to add a weapon to your Combo Bar, right click it
- Equipped hats will be highlighted in your inventory
- Weapons added to your Combo Bar will be removed from your inventory
- Locked weapons cannot be moved to your Combo Bar
- Locked items cannot be moved

- Locked items cannot be moved or sold
- Unlock by pressing the 'L' key and left clicking the item
In-Game Chat
The game's chat area is located in the top left of the game's window under your health and stamina bars
Press Enter to be able to enter in text into the chat and press Enter to send that text
There are two options for your chat input's destination
- World
- Can be see by anyone online
- White text
- Circle
- Can only be seen by people in your Circle, see Circle section below
- Green text
There are small indicators on the left side of each message that depict the time since that message was sent

- Green - 2 minutes or less
- Yellow - Between 2 and 10 minutes
- Red - Over 10 minutes
- Page-Up/Page-Down
- Mouse Wheel
- Home or End
Chat Commands
Commands can be entered into the chat to do various things
Commands start with a forward slash (/)
Try it by typing "/help" into the chat without the quotes
Item Claim

Item Claim is a place where rewards from various milestones/events/unlocks are sent to
You will be notified in-game if a new claim is available to you
- In-game chat message
- Orange icon on the Item Claim menu button
- Left-clicking an item in the list will show what the Claim contains
- Clicking 'Recieve' will add it to your inventory and remove it from the list
Character Progression
Leveling


Stat points are one way to strengthen your character
There are 6 different types of stats for your character
Abilities increase the performance of your character
Upon learning, if you have an unoccupied slot in your ability hotbar, it will automatically be placed there
If you want to add a previously removed ability back to your hotbar, click the Abilities menu icon and right click the one you wish to add
ACTs are another type of combat helpers
They drop from any mob that isn't a boss, and their chances increase the higher the health of the mob
There are 4 different ACTs

To select your active ACT, use the UI button
The UI button also changes its appearance depending on which ACT (or none) you have selected
The ACT Select UI displays a few pieces of information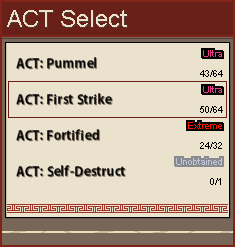
Changing your active ACT has a 5 minute cooldown
Potions
There at 6 types of potions
Circles
Circles are like small guilds or clans but are limited to a maximum of 3 people
To create a Circle, do as follows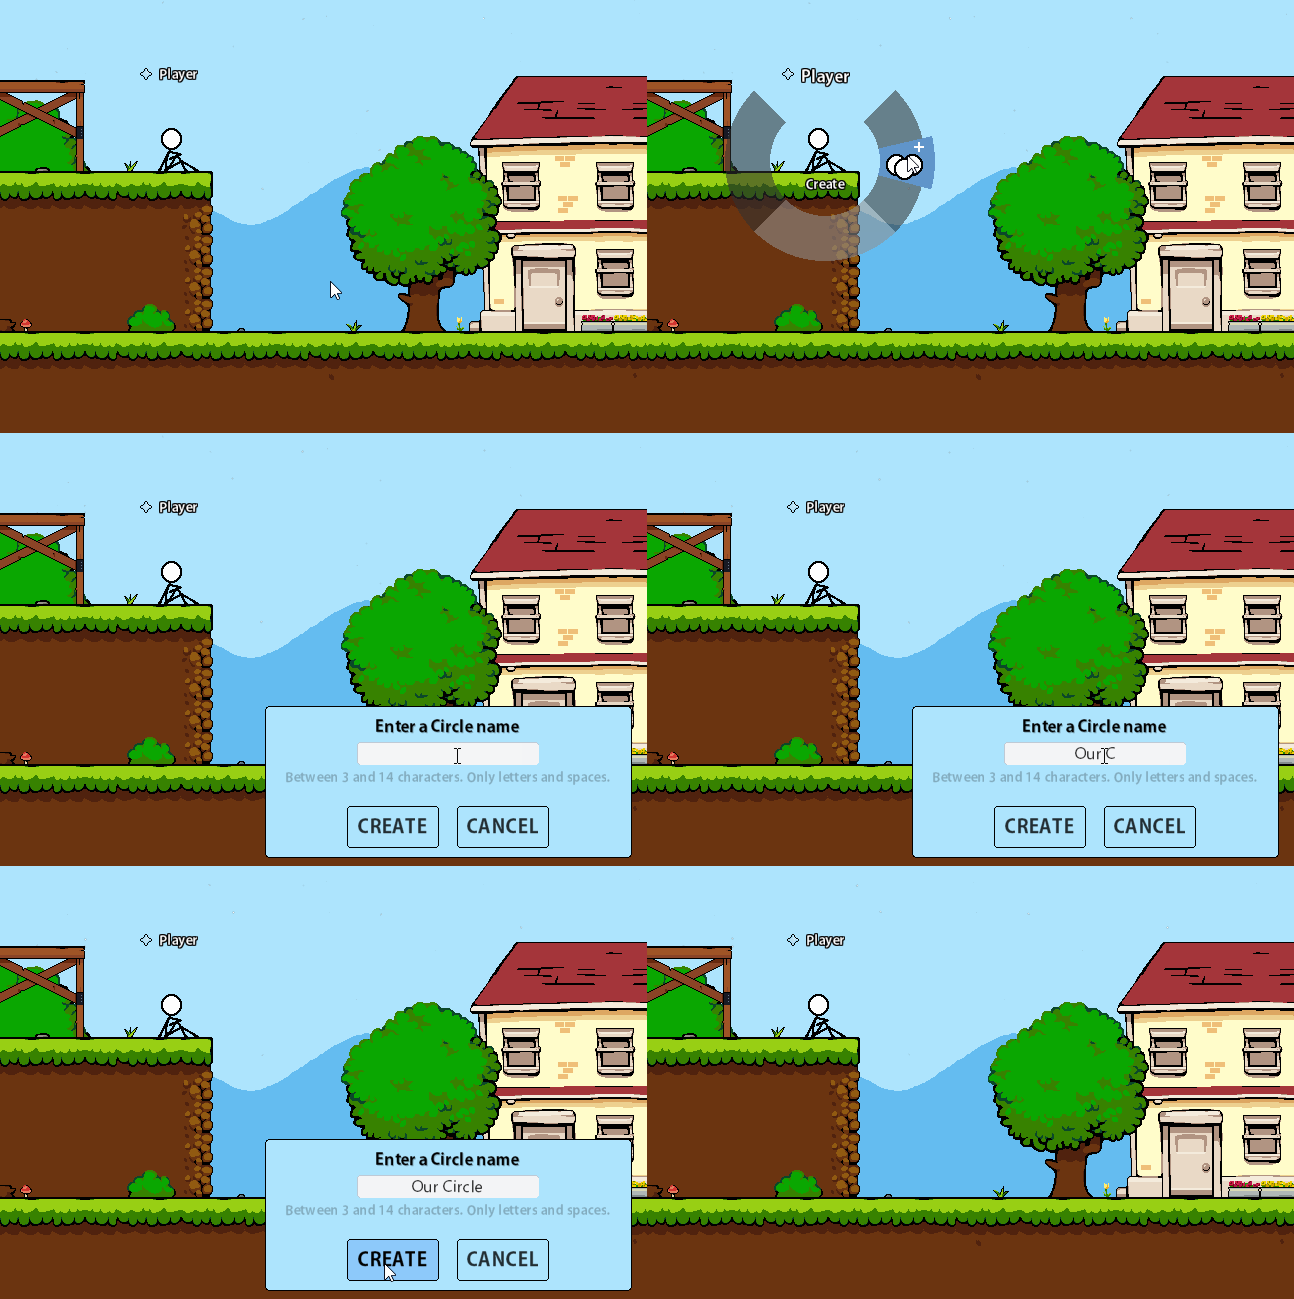
To access the Circle UI while you're in a Circle, do as follows
Circle's have 3 ranks
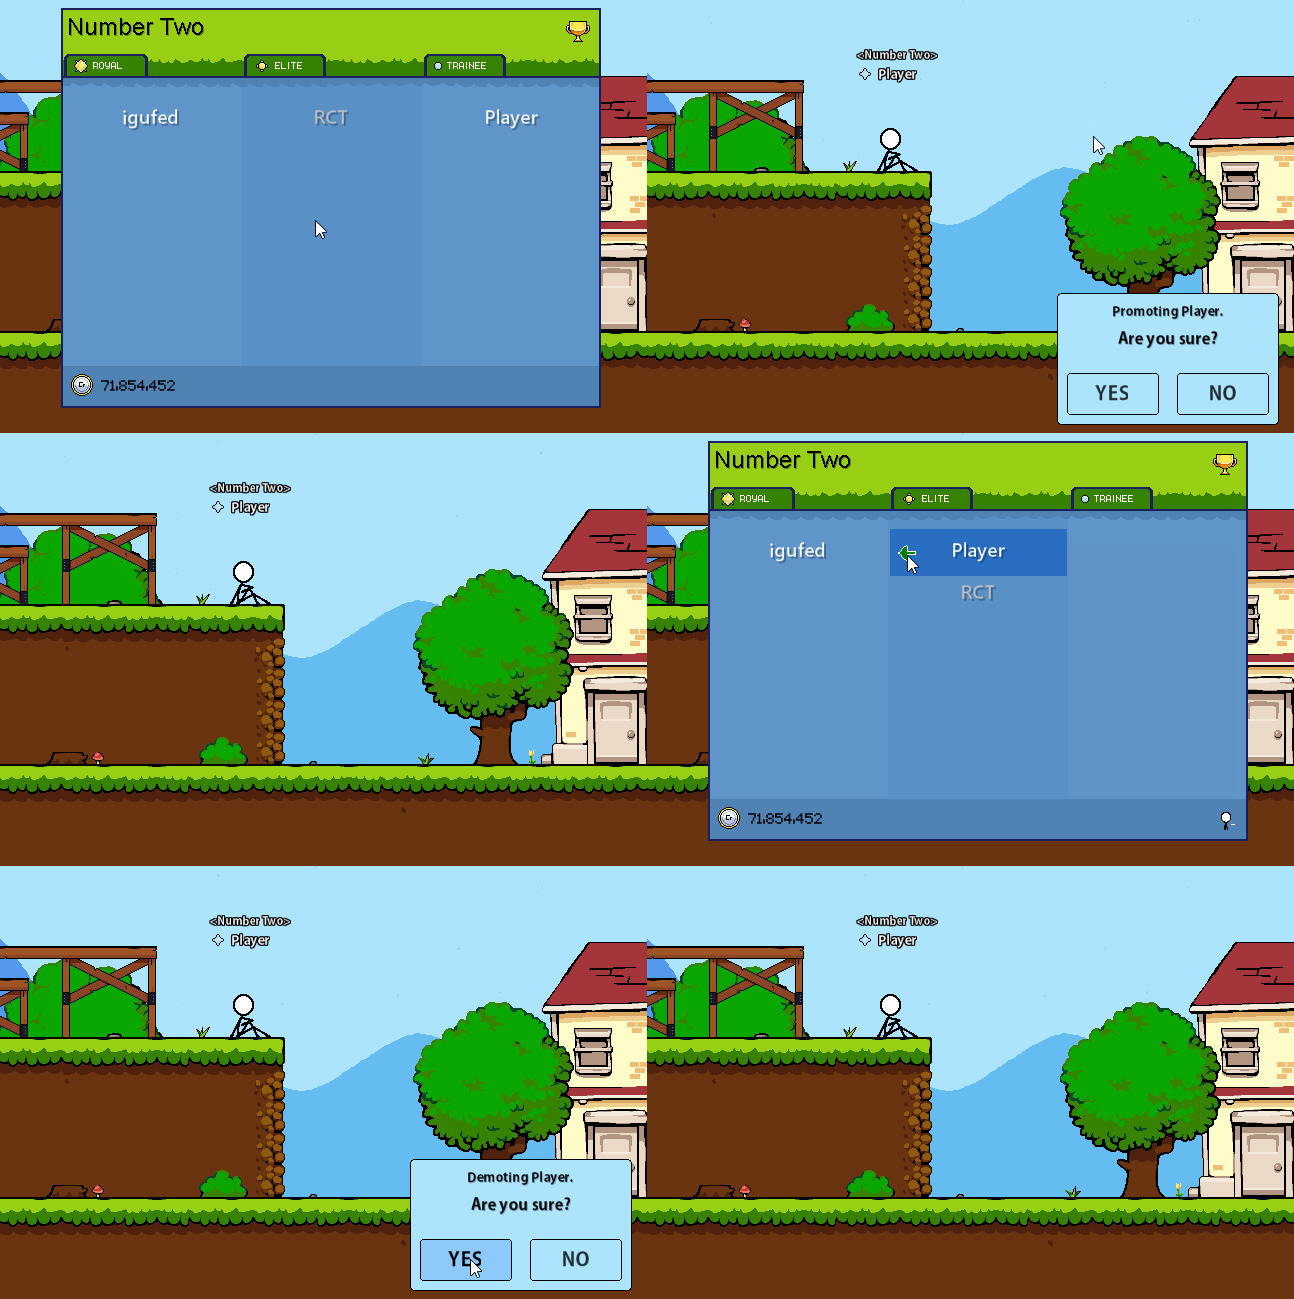
Using the same process as promote, you click the red arrow to the right of their name, then confirm
Kicking a user is similar
Circle Shop
The Circle Shop is located on the main Circle UI if you click the Credits icon in the bottom left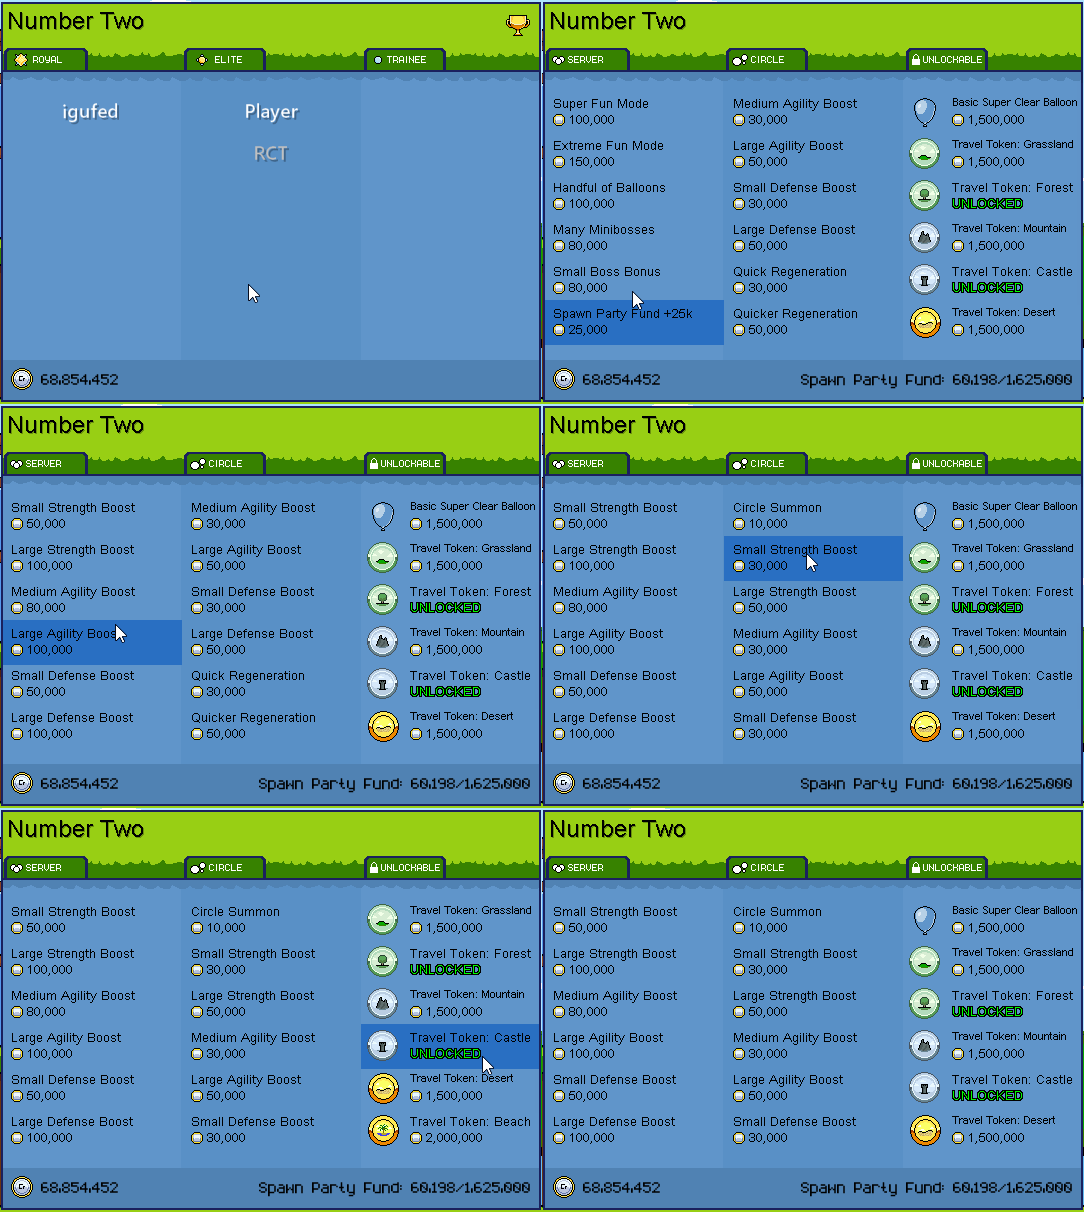
Every other week there are Circle Competitions with various rewards
This is a PvE competition where Circles try to kill the most monsters of specific zones
To check the status of the current competition, open your Circle UI and click the trophy icon in the top right
On the bottom left of the Competition UI, you'll see text showing what kind of week it is and how long until the next phase begins
The text will show one of the following
Your Circle cannot win more than one zone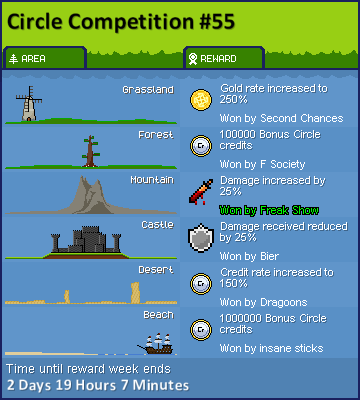
If you won a zone with a Circle Credits +100k/250k/1m, those credits are instantly applied to your Circle upon calculation
Spawn Party Mechanic
This automatic spawn party will occur when the 'Spawn Party Fund' reaches its goal
You can also fund it with Circle Credits in the Circle Shop
Once the fund is 100k away from the goal, killing monsters no longer adds to it and funds must be added through the Circle Shop to reach the goal
Once the goal is reached, a message will show in-game and in 10 minutes will begin
Leveling

- You start out at level 1 and gain 'xp' by killing monsters out in the world
- Also start with 10 stat points to spend, see Stats section below
- Your current level's progress is shown in yellow below your red health bar, and green stamina bar
- When you reach enough 'xp', your level will increase
- You gain 1 stat point (for reaching levels 99 and below)
- Your max health and max stamina both increase by 2
- Max level is 100

- You now gain 'credits' instead of 'xp' from killing monsters
- Where your 'xp' progress was is now changed to a 'credit' value
- You have access to the Level 100 Shop located near the top of the Mountain
- See Items section below

Stat points are one way to strengthen your character
There are 6 different types of stats for your character
- Strength (STR)
- Increases damage on all of your attacks
- Increases knockback of weapons that add knockback
- Vitality (VIT)
- Increases your max health by 4 for each point of VIT
- Every 6 VIT increases your health regeneration by 2 while sitting
- Every 4 VIT slightly reduces the time before your health starts regenerating while sitting
- Agility (AGI)
- Increases your movement speed
- Increases your crouch-jump height
- Intelligence (INT)
- Increases your max stamina by 5 for each point of INT
- Every 6 INT increases your stamina regeneration by 1 while standing and 2 while sitting
- Every 4 INT slightly reduces the time before your stamina start regenerating
- Increases the effect of active abilities (see Abilities section below)
- Defence (DEF)
- Lowers the amount of damage you take when getting hit
- Decreases the distance you are knocked back if hit with a knockback skill/weapon
- Cannot use stat points to increase DEF
- Every 10 levels you gain 1 DEF
- Any DEF above 10 mitigates more damage per point than those that are 10 and below
- Dart (DART)
- Lowers DART cooldown
- Increases DART speed
- Max DART level is 30

Abilities increase the performance of your character
- Scales based off of your INT stat
- AGI - Increases your movement speed
- ASPD - Increases your attack speed
- CDR - Decreases cooldowns of weapons
- DEF - Increases your defence
- JUMP - Increases your crouch-jump height
- STR - Increases your strength
- Level 1 - Sold in the Grassland
- Small gains
- Lasts 3 minutes
- 5 minute cooldown
- No learning requirement
- Level 2 - Obtained from the Elder Spirit
- Large gains
- Lasts 3 minutes
- 5 minute cooldown
- No learning requirement
- Replaces Level 1 of same type
- Level 3 - Obtained from the Rogue GM
- Large gains
- Lasts 3 minutes
- 3 minute cooldown
- Must have learned the Level 2 equivalent to learn the Level 3
- Replaces Level 2 of same type
- Hybrids - Obtained from the Captain
- Combination of 2 abilities
- When learned, gains are 50% of their Level 3 variant, but can be up to 120%
- Lasts 3 minutes
- 3 minute cooldown
- Must have learned their Level 3 equivalent for both of the abilities
- Does not replace their Level 3 variants
- BIG H - Obtained after boosting all 15 Hybrid abilities to 120%
- Combination of all 6 ability types
- Same gains as Level 2s
- Lasts 3 minutes
- 5 minute cooldown
- Does not replace any learned abilities

- Abilities on cooldown will be slightly dim on your hot bar
- Activating an ability deactivates any others you have active
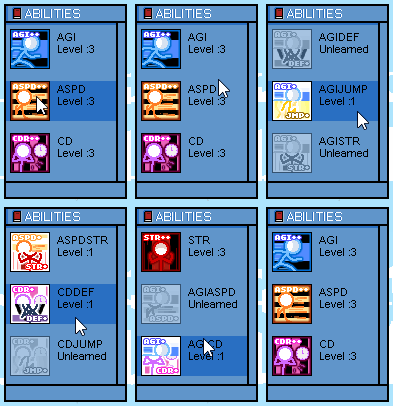
- Left click+drag - Moves/swaps ability placements
- Shift+Right click - removes the ability from your hot bar
Upon learning, if you have an unoccupied slot in your ability hotbar, it will automatically be placed there
If you want to add a previously removed ability back to your hotbar, click the Abilities menu icon and right click the one you wish to add
- Use your mouse wheel to scroll through the Ability listings
ACTs are another type of combat helpers
They drop from any mob that isn't a boss, and their chances increase the higher the health of the mob
There are 4 different ACTs
- Pummel - All attacks that hit within 1.5s of the previous hit give you a stack. Each stack gives you increased damage. Maximum stacks is 5 and maximum increased damage is 25% at Hyper.
- First Strike - After not attacking for 7.5s, your next attack will have increased damage up to 25% at Hyper
- Fortified - After not taking damage for 7.5s, damage is reduced on your next hit against you up to 25% at Hyper
- Self-Destruct - Every minute, you absorb any damage recieved for the next 1-10 seconds. After the absorb ends, you take all damage absorbed at once.
- Basic - dropped 1
- Advanced - dropped 2
- Greater - dropped 4
- Superb - dropped 8
- Extreme - dropped 16
- Ultra - dropped 32
- Hyper - dropped 64

To select your active ACT, use the UI button
The UI button also changes its appearance depending on which ACT (or none) you have selected
The ACT Select UI displays a few pieces of information

- ACT name (or None)
- The tier of each of your ACTs (or Unobtained)
- The amount you current have towards the next tier
- Currently active ACT will have a border around that list item
Changing your active ACT has a 5 minute cooldown
Potions

There at 6 types of potions
- Health Potion - Instantly recovers 50% of your max hp
- Stamina Potion - Instantly recovers 50% of your max stamina
- Vial of Strength - Greatly increases your STR for 15 seconds
- Vial of Speed - Greatly increases your movement speed for 15 seconds
- Vial of Launch - Greatly increases your crouch-jump height for 15 seconds
- Vial of Impatience - Greatly decreases your attack cooldowns for 15 seconds
- Mouse over the potions to what it does and how many you have
- Left-click to make the potion you are hovering over your active potion
- Release tab or left-clicking over a potion will take you out of the ui
- Your active potion is shown on the left side of your combo bar as well as any current cooldowns
- Potions have a cooldown of 1 minute
Circles
Circles are like small guilds or clans but are limited to a maximum of 3 people
To create a Circle, do as follows

- Hover over another player that is not in a Circle and hold CTRL
- On the radial menu, select 'Create Circle'
- On the input prompt, type the Circle's name you want
- The other player then recieves a notification that allows them to join or not
- The other player must join for the Circle to be created
To access the Circle UI while you're in a Circle, do as follows
- Hover over yourself with your mouse and hold CTRL
- Left-click on 'My Circle'
- White - Online
- Grey - Offline
Circle's have 3 ranks
- Royal - Can invite people into the Circle, promote up to Royal, demote and kick people who rank lower, and use the Circle Shop
- Elite - Can invite people into the Circle, promote up to Elite, kick Trainees, and use the Circle Shop
- Trainee - no permissions

- Select their name in the member list
- Click the green left arrow to the left of their name
- Confirm on the prompt
Using the same process as promote, you click the red arrow to the right of their name, then confirm
Kicking a user is similar
- Rank higher than them
- Select their name in the member list
- In the bottom right of the UI, select 'Kick PlayerName'
- Confirm on the prompt
- If you leave or get kicked from a Circle, you cannot join another one for 7 days
Circle Shop
The Circle Shop is located on the main Circle UI if you click the Credits icon in the bottom left

- The Circle Shop uses Circle Credits as currency
- Circle Credits are obtained by killing monsters and there is no level requirement
- Your current amount of Circle Credits will be listed in the bottom left of the Circle UI and Circle Shop UI
- Server Wide buffs
- Lasts 2 hours
- Affects everyone online
- Can only have 1 server buff active at a time
- Server buffs include the following
- Small Strength Boost - Slight increase to player strength
- Large Strength Boost - Big increase to player strength
- Medium Agility Boost - Decent increase to player movement speed
- Large Agility Boost - Big increase to player movement speed
- Small Defense Boost - Slight increase in player defense
- Large Defense Boost - Big increase in player defense
- Quick Regeneration - Slightly lowers time in between regenerative ticks
- Quicker Regeneration - Large reduction of time in bewtween regernative ticks
- Super Fun Mode - Slight increase in player attack speed, decrease in player attack cooldowns and slight reduction in time between regenerative ticks
- Extreme Fun Mode - Large increase in player attack speed, greatly reduced player attack cooldowns, large decrease in time between regenerative ticks
- Handful of Balloons - Decent decrease in player gravity
- Many Minibosses - Doubles the weight of miniboss spawn chance
- Small Boss Bonus - Doubles the amount of progress qualifying monsters have for Elder Spirit and Rogue GM spawns
- Spawn Party Fund +25k - Increases the Spawn Party Fund by 25,000
- Spawn Party Fund +100k - Increases the Spawn Party Fund by 100,000
- While a buff is active, in the Circle Shop UI, a green timer will be shown for time remaining on any active buffs
- Circle Only buffs - only affects your Circle members
- Lasts 1 hour
- Affects only members of your Circle
- Can have multiple Circle buffs at the same time
- Cannot have two of the same type of Circle buff active at the same time
- ie. Small Stregth Boost and Large Strength Boost
- Can stack with an active Server buff, including the same type
- If Large Strength Boost is active on the Server buff side, you can still have Large Strength Boost active for your Circle buff
- Circle buffs include the following
- Circle Summon - Moves all Circle members who are online to your location
- Small Strength Boost - Slight increase to player strength
- Large Strength Boost - Big increase to player strength
- Medium Agility Boost - Decent increase to player movement speed
- Large Agility Boost - Big increase to player movement speed
- Small Defense Boost - Slight increase in player defense
- Large Defense Boost - Big increase in player defense
- Small Defense Boost - Slight increase in player defense
- Large Defense Boost - Big increase in player defense
- Quick Regeneration - Slightly lowers time in between regenerative ticks
- Quicker Regeneration - Large reduction of time in bewtween regernative ticks
- While a buff is active, in the Circle Shop UI, a green timer will be shown for the time remaining on any active buffs
- Permanent consumables for Circle members
- The following items are given to all Circle members if unlocked for your Circle
- They are also taken away from you if you leave or get kicked from a Circle
- Basic Super Clear Balloon
- Grasslands Travel Token
- Forest Travel Token
- Mountain Travel Token
- Castle Travel Token
- Desert Travel Token
- Beach Travel Token
- If unlocked, will show a green 'UNLOCKED' text in the Circle Shop UI
Every other week there are Circle Competitions with various rewards
This is a PvE competition where Circles try to kill the most monsters of specific zones
To check the status of the current competition, open your Circle UI and click the trophy icon in the top right
On the bottom left of the Competition UI, you'll see text showing what kind of week it is and how long until the next phase begins
The text will show one of the following
- Time until competition week begins
- Time until competition week ends
- Time until reward week begins
- Time until reward week ends
Your Circle cannot win more than one zone
- For points to be awarded, you must have at least 2 people in your Circle
- Killing any naturally spawning monster will reward your Circle points for that zone
- One point per Circle member per monster who hits it
- If you have 3 Circle members online and you all 3 hit the same monster, that's 3 points
- If you have 2 Circle members online and only 1 of you hits a monster, that's 1 point
- If your Circle kills the most monsters in the Forest and Desert, the higher number of kills is which zone you will win
- If the above scenario plays out, the second highest Circle for the Desert will now win the Desert reward

- Luck +10%
- Drop Rate +1
- Circle Credits +100,000
- Circle Credits +250,000
- Circle Credits +1,000,000
- Gold Rate +150%
- Credit Rate +20%
- Credit Rate +50%
- Damage +25%
- Damage Taken -25%
- If your Circle has won a zone, your Circle name will be highlighted green in the Circle Competition UI
If you won a zone with a Circle Credits +100k/250k/1m, those credits are instantly applied to your Circle upon calculation
Spawn Party Mechanic
This automatic spawn party will occur when the 'Spawn Party Fund' reaches its goal
- Current funds and goal are listed at the bottom right of the Circle Shop UI
You can also fund it with Circle Credits in the Circle Shop
Once the fund is 100k away from the goal, killing monsters no longer adds to it and funds must be added through the Circle Shop to reach the goal
Once the goal is reached, a message will show in-game and in 10 minutes will begin

- Contains waves of monsters from all zones of the map
- Guaranteed minibosses from every zone
- All drop rates from spawn party monsters are at 3x
World
The Agos map consists of 6 different zones
Spawn lamps are located in various spots across the map
They are used to save your 'spawn point'
A spawn lamp will be 'lit' if it is your current spawn point
Shops
Shops are used to sell unwanted items or to purchase items
Every so often, a chat message will appear from a specific Boss
These indicate the current progress that boss is at which is used to determine how close you are to spawning it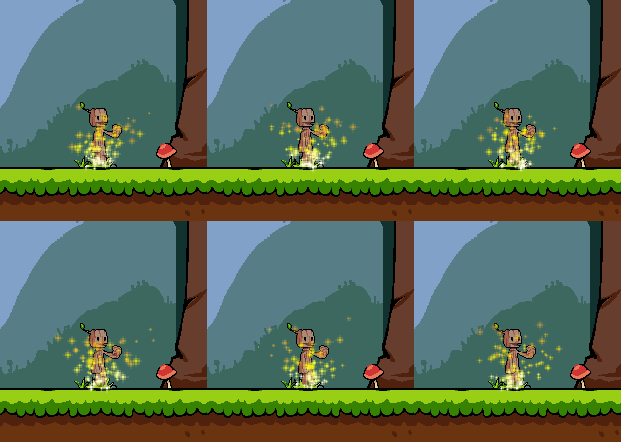
Any monster that moves that is not a boss can be a rare monster
Killing a rare monster guarantees you an item from its loot table
Any time a rare monster spawns, it has a 1/20 chance to become a very rare monster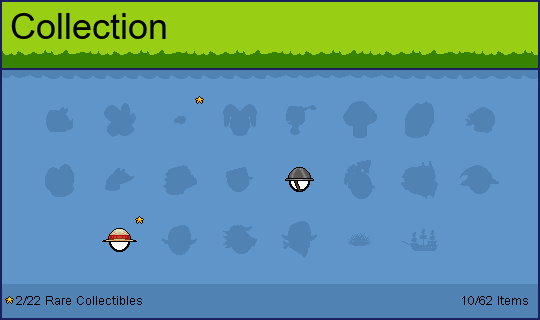
Your Collection is a set of 22 different groups each with their own undisclosed set of items to get.
The game will tell you if you get a required item.
Once you complete one of the groups, their icon on the Collection display with be colored instead of blanked out.
Along with normal item drops, there is a 'Rare Collectible' from each group. The game will let you know if you've gotten one of these and also put a gold star next to the group that it belongs to.
There are 62 normal item drops and 22 Rare Collectibles to get to complete the entire Collection.
Once you complete the entire Collection, you will get a +4% increase to the odds of getting an X Weapon Fuse for a total of 5% chance.
Logbook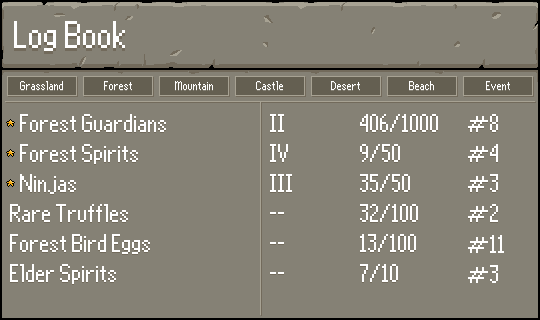
The Logbook is a count of mobs killed by you in Agos.
On the right side of the UI shows a few pieces of information.
Reaching Tier I or higher for a group will unlock that specific group to spawn for you in the BUG Zone.
Increasing a Tier will grant you a Travel Token to the BUG Zone.
Reach Tier I or higher in all categories with a gold star next to it will grant you a permanent travel token to the BUG Zone.
BUG Zone
The BUG Zone is a part of the map only accessible from using Travel Token: BUG Zone.
There is no health nor stamina regeration. You must rely on potions and hat traits to gain back health and stamina
Potions have reduced cooldowns
Mob spawns work differently here.
What can spawn here depends on who is currently in the area and what groups they've unlocked.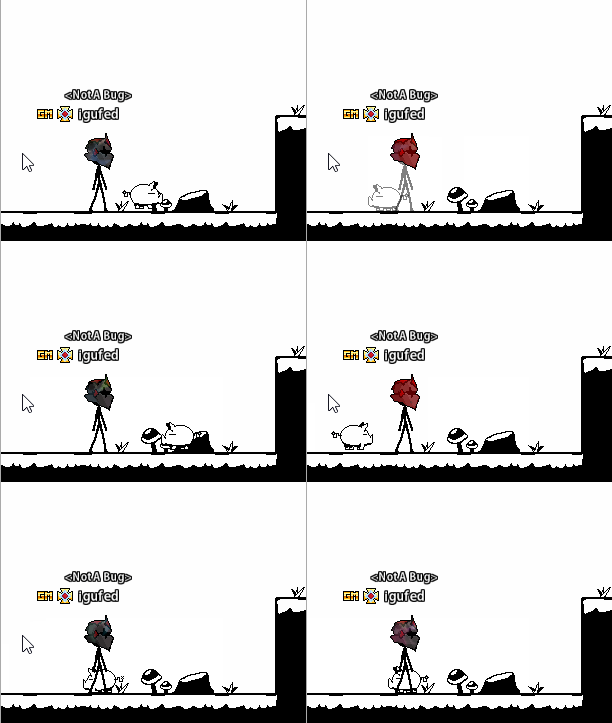
Mobs in this area also may have additional mechanics to their behavior.
Loot from mobs also work differently from here.
Upon killing a BUG Zone mob, you will get either a random amount of gold, credits, or xp.
If a mob normally drops a hat, you can get a Bugged version of that hat.
Bugged hats have a shimmer effect on them and are also reactive when you get hit.
Odds of getting an item drop here are affected by that mob's Tier in your Logbook. Increasing the Tier increases your odds of an item.
Outside of Bugged hats, there is only 1 weapon drop in this zone (from the 3 Bugged Bosses) and BUG Zone exclusive cosmetics.
To leave the BUG Zone, you must either die, use a different Travel Token, or exit the game. There is no saving your spawn in the BUG Zone.
Seasonal Events
Valentine's
All times listed are server time (UTC-6 or 5 depending on time of year)
The Agos map consists of 6 different zones
- Grassland
- Forest
- Mountain
- Castle
- Desert
- Beach

Spawn lamps are located in various spots across the map
They are used to save your 'spawn point'
- Press CTRL at a spawn lamp to set it as your spawn point
A spawn lamp will be 'lit' if it is your current spawn point
Shops
Shops are used to sell unwanted items or to purchase items
- CTRL near a shop to open the shop UI
- SHIFT+Right-Click an item in your inventory to sell it
- Right-Click an item in the shop UI to purchase
- Mouse wheel can be used to scroll through each column in the shop UI
- First Stop Shop
- Located in the Grassland
- Uses gold for currency
- Various early game items and a couple high priced show-off items sold here
- Willy
- Located in the Grassland
- Uses gold for currency
- Level 1 abilities sold here
- Perry
- Located near the top of the Mountain
- Uses credits for currency
- Various rare hats and weapons sold here
- Multiple character buffing items sold here
- Henry
- Can be anywhere in the world
- Uses gold for currency
- Wears his HeliHat while holding balloons he is selling
- Various Balloon related items and a rare hat sold here
- Is only available for 10 minutes
- Poppy
- Located in the Forest
- Uses Piece of Pie item for currency
- All items made for Piece of Pie past events (along with any new items made specifically for this event) are for sale
Every so often, a chat message will appear from a specific Boss
These indicate the current progress that boss is at which is used to determine how close you are to spawning it
- Elder Spirit
- Located in the Forest
- Progress text is green and is from 'Elder Spirit'
- Progress is made by killing Forest Spirits in the Forest
- Must be level 90 or higher to get loot
- Rogue GM Information
- Can spawn at any Spawn Lamp
- Progress text is white and is from 'Garfield'
- Progress is made by killing any monster at the Castle
- Must be level 100 to get loot
- Captain
- Located at the far right side of the Beach
- Progress text is yellow and surounded by music notes
- Progress is made by killing igufed's Totally Awesome Looking Ship at the Beach
- Must be level 100 to get loot
- If eligible, drops from Bosses are guaranteed depending on your total damage inflicted
- No damage requirement for the Boss' normal loot table
- 1,000 - Respective Ability, random on type
- 2,000 - BUG Breaker
- 4,000 - Booshy x1, Booshy Bundle if its the Captain
- 7,000 - Weapon Fusion Voucher


Any monster that moves that is not a boss can be a rare monster
- Grassland, Forest, Moutain default is 1/500 for normal monsters
- 1/100 for minibosses
- Castle, Desert default is 1/5000 for normal monsters
- 1/500 for minibosses
- No beach monster can be rare
Killing a rare monster guarantees you an item from its loot table
- Your drop rate will apply allowing for multiple guaranteed items from a single monster
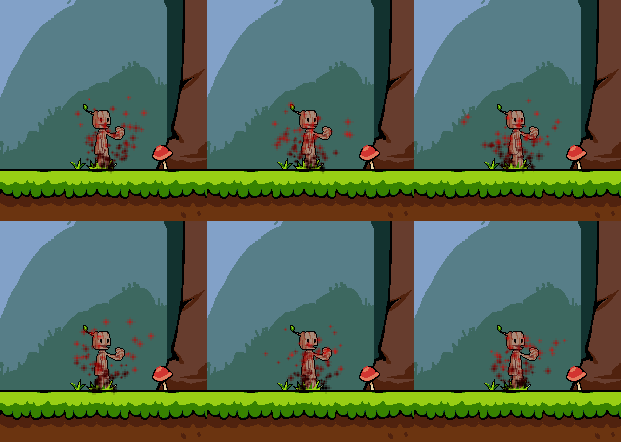
Any time a rare monster spawns, it has a 1/20 chance to become a very rare monster
- These will also have 3x their normal health
- Very rare and higher drops always display a chat message in gold to everyone when picked up
- If the very rare monster normally does not have very rare or higher items in its loot table, you will have a chance to get nothing

Your Collection is a set of 22 different groups each with their own undisclosed set of items to get.
The game will tell you if you get a required item.
Once you complete one of the groups, their icon on the Collection display with be colored instead of blanked out.
Along with normal item drops, there is a 'Rare Collectible' from each group. The game will let you know if you've gotten one of these and also put a gold star next to the group that it belongs to.
There are 62 normal item drops and 22 Rare Collectibles to get to complete the entire Collection.
Once you complete the entire Collection, you will get a +4% increase to the odds of getting an X Weapon Fuse for a total of 5% chance.
Logbook

The Logbook is a count of mobs killed by you in Agos.
On the right side of the UI shows a few pieces of information.
- Current tier for that group
- Progress of current tier and how many are in a tier
- Current placement vs other Agos players for that group
Reaching Tier I or higher for a group will unlock that specific group to spawn for you in the BUG Zone.
Increasing a Tier will grant you a Travel Token to the BUG Zone.

Reach Tier I or higher in all categories with a gold star next to it will grant you a permanent travel token to the BUG Zone.
BUG Zone
The BUG Zone is a part of the map only accessible from using Travel Token: BUG Zone.
There is no health nor stamina regeration. You must rely on potions and hat traits to gain back health and stamina
Potions have reduced cooldowns
Mob spawns work differently here.
What can spawn here depends on who is currently in the area and what groups they've unlocked.

Mobs in this area also may have additional mechanics to their behavior.
Loot from mobs also work differently from here.
Upon killing a BUG Zone mob, you will get either a random amount of gold, credits, or xp.
If a mob normally drops a hat, you can get a Bugged version of that hat.
Bugged hats have a shimmer effect on them and are also reactive when you get hit.
Odds of getting an item drop here are affected by that mob's Tier in your Logbook. Increasing the Tier increases your odds of an item.
Outside of Bugged hats, there is only 1 weapon drop in this zone (from the 3 Bugged Bosses) and BUG Zone exclusive cosmetics.
To leave the BUG Zone, you must either die, use a different Travel Token, or exit the game. There is no saving your spawn in the BUG Zone.
Seasonal Events
Valentine's
- Occurs the two weeks surrounding February 14th
- Adds event specific monsters into the world
- Event specific cosmetics can be obtained
- Occurs the two weeks surrounding March 17th
- Adds event specific monsters into the world
- Increases your base luck by a small percent
- Event specific cosmetics can be obtained
- Full month of April
- Allows monsters in the world to spawn with balloons
- Special animated balloons can be obtained
- Once per Henry spawn, you can purchase a Gift Bag from him
- Full month of June
- Doubles the AGI, STR, VIT and INT of all hats
- Full month of September
- Adds Anniversary Gifts to the world
- Free source of Prize Wheel and Premium Prize Wheel Tokens
- Enables the Anniversary Hat to reach its full potential
- +5 to AGI, STR, VIT, INT, +10 DEF, Greater Launch, Advanced Boost
- Occurs the two weeks leading up to October 31st
- Adds event specific monsters into the world
- Added mechanic of 'Trick or Treat'
- Knock on houses to see if you get Tricked, Treated or are knocking on an empty house
- Event specific weapon, hats and cosmetics can be obtained
- Occurs the two weeks leading up to December 31st
- Adds event specific monsters into the world
- Event specific hats and cosmetics can be obtained
- Occurs for two weeks starting on the 8th of these months: January, May, July, August, November
- Adds Piece of Pie item drops from all mobs
- Opens a shop that you can use your Piece of Pie items as currency
All times listed are server time (UTC-6 or 5 depending on time of year)
- Sunday
- 8am - Extreme Fun Mode
- 1pm - 2x Credits, 2x Drop, 10x XP
- 8pm - Extreme Fun Mode
- Wednesday
- 8am - 2x Credits, 2x Drop, 10x XP
- 8pm - 2x Credits, 2x Drop, 10x XP
- Thursday
- 8am - 2x Credits, 2x Drop, 10x XP
- 8pm - 2x Credits, 2x Drop, 10x XP
- Friday
- 8am - 2x Credits, 2x Drop, 10x XP
- 8pm - 2x Credits, 2x Drop, 10x XP
- Saturday
- 8am - Extreme Fun Mode
- 1pm - 2x Credits, 2x Drop, 10x XP
- 8pm - Extreme Fun Mode
Items
There are 2 main types of items
Weapons are your main offensive tool
Right clicking them in your inventory will add it to your next available slot on your combo bar
Each weapon has its own unique stats and animations
Hovering over a weapon in your inventory will show a tooltip with some information about it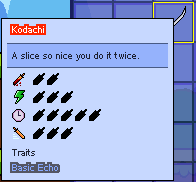
Weapon traits are special attributes that some weapons have that add extra effects to that weapon
Possible Weapon Traits are as follows
Hats
Hats are your main defensive tool
Right clicking a hat in your inventory will equip it onto your character Hats also have their own unique stats and looks
Hovering over a hat in your inventory will show some information about it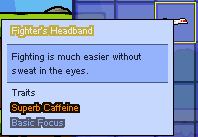
Hat traits are special attributes that some hats have that add extra effects to that hat
Possible Hat Traits are as follows
Stat Reset
A Stat Reset is a consumable item and when used will remove all of your set stat points and allows you to redistribute them
Obtained from Perry and Box of 40
Inventory Token
This inventory token will add another row of available space to your inventory (8 slots) up to a maximum of 16 rows (128 slots)
Obtained from Perry and as a Donation Gift
Spawnable Merchants
There are 2 spawnable merchants
Public
Platforms
Platforms are used to create safe spots or to help access higher ground
There are 3 types of platforms
Travel tokens are used to instantly move you to set locations for the zone the token is for
Obtained from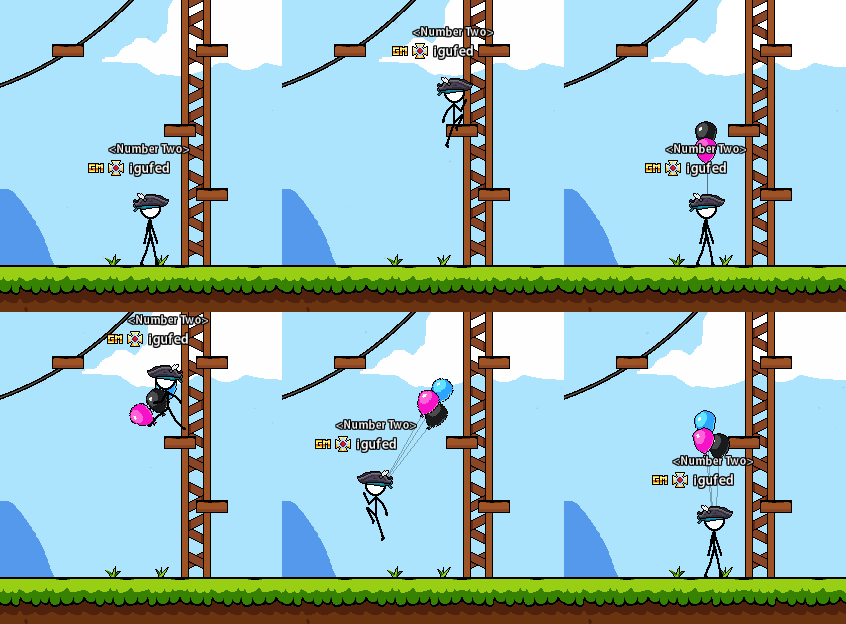
Balloons are used to lower your gravity by a little bit per balloon, helping you reach higher areas
Obtained from
Balloons will pop if you get hit
You can only have a maximum of 3 balloons out at a time
Prize Wheel Tokens
Prize Wheels are a lootbox of sorts with various rewards
There are 3 types
Drop Rate reward does not stack with the Drop Rate server setting
Drop Rate reward does not stack with effects from Trihard+ nor Drop Rate Boosts
Drop Rate Boosts
Drop Rate Boosts come in 2 types
Drop Rate increase not applied to Bosses
Cannot be used with Trihard+
Trihard+
Trihard is a PvE mechanic that gives 3 positives and 3 negatives
The Positives are
Trihard+ can bought from the Private Merchant
Big Death
Big Death is a feature you can use when you reach level 100.
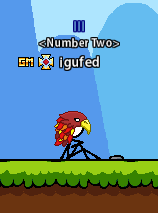 When used, it resets your level back 1, removes all stat points, and shows a blue roman numeral above your head to signify how many times you've used the item.
It costs 15% of your current gold and credits for its first use, and increases 15% each use up to 100%.
It is obtained through Item Claim upon reaching level 100.
Remix Tokens
Remix Tokens temporarily reset your stats to a random build for 10 minutes
Possible builds are as follows
Random Remix Tokens can be obtained through Perry or Box of 40
Hat Fusion Voucher
Hat Fusions enable you to combine two hats together at the cost of 30-40% of the combined stats
Currently obtained from minibosses, bosses and Box of 40
To access the UI, right click the icon in your inventory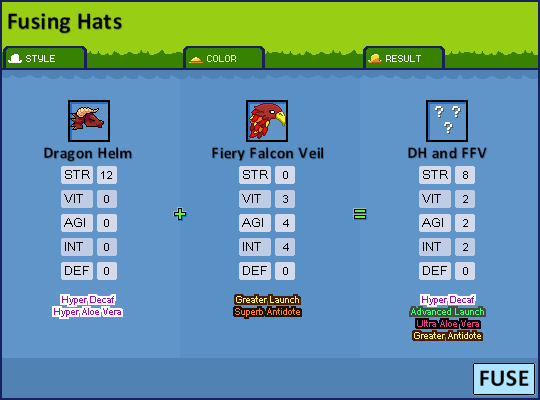
The stats of the result hat will be 60-70% of the combined total of the main stats, 100% of either negative trait stats, and 60% of either hat's positive traits
You cannot fuse an already fused hat
Weapon Fusion Voucher
Weapon Fusions enable you do buff any non-event weapon
Currently obtained from bosses
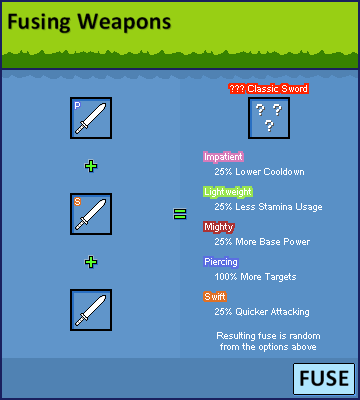
To access the UI, right click the icon in your inventory
The random buffs possible are
Hat Fusion Swapper
This voucher enables you to swap between the selected fused hat and swap the appearance
Currently obtained from any miniboss that's not bugged
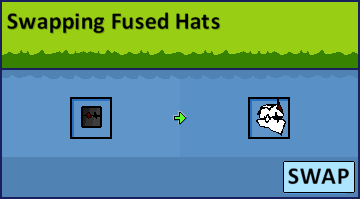
To access the UI, right click the icon in your inventory
BUG Breaker
Using one of these disables a specific Log Book group from spawning in the BUG Zone for 1 hour
Multiple groups can be disabled at the same time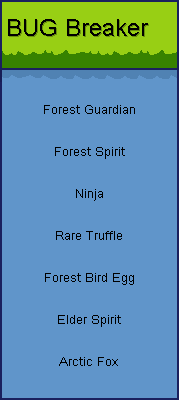
Right click in your inventory to bring up the UI
 Text will be displayed to everyone in the BUG Zone if a group is disabled
Public Beach Umbrella
When used, places an umbrella at your location
While near a placed umbrella, your resist to 'Burn' is greatly increased
Warding Totems when used add the highest level of resist to nearly all damaging and movement debuffs
Along with your inventory, you have Storage available to you
You can see the contents of your storage on the 'Storage' tab of your inventory
To access your storage, you will need a Storage Key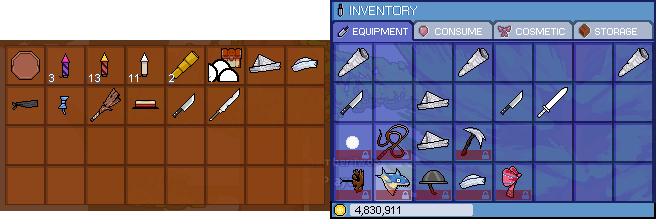
Anything in the Equipment or Consume tab of your inventory can be stored in storage
Lootboxes
Lootboxes can contain various items depending on the box
Various boxes can be obtained from
If the sum of all of the percentages on the right side do not equal 100, you may just get a small amount of gold instead of an item
There are 2 main types of items
- Equipment
- Weapons
- Hats
- Consumables
- Various player buffs
- Various helpers
- Unlearned cosmetics
- Various lootboxes
Weapons are your main offensive tool
Right clicking them in your inventory will add it to your next available slot on your combo bar
Each weapon has its own unique stats and animations
Hovering over a weapon in your inventory will show a tooltip with some information about it

- Name
- Description
- Rating of 4 core weapon stats
- Base damage - Higher rating means more base damage
- Stamina Cost - Higher rating means less stamina cost to use
- Cooldown - Higher rating means lower cooldown
- Attack Speed - Higher rating means faster attack speed
- Any associated Traits
Weapon traits are special attributes that some weapons have that add extra effects to that weapon
Possible Weapon Traits are as follows
- Blind - Causes hit targets (PvP) to have their sight massively reduced for a short time
- Bleed - Causes hit targets (PvP and PvE) to get a damaging Bleed effect over time
- Burn - Causes hit targets (PvP and PvE) to get a damaging Burn effect over time
- Echo - Has more than 1 frame that can cause damage to hit targets and can hit on all frames
- Entity - Produces a projectile not attached to your character that will cause contact damage to targets
- Explosive - Causes hit targets to get knocked back away from the attacker
- Fear - Causes hit targets (PvP and PvE) to have no control over their movements for a short time
- Force - Causes hit targets to get knocked back in the direction opposite to where the attack came from
- Freeze - Causes hit targets (PvP) to have reduced movement and attack speed
- Gravity Glitch - Throws target into the air and slams them down
- Lasting Strike - Has more than 1 frame that can cause damage to hit targets but stops after target is hit
- Piercing - Allows hitting multiple targets with the same attack
- Poison - Causes hit targets (PvP and PvE) to get a damaging Poison effect over time
- Shock - Causes hit targets (PvP and PvE) to not be able to attack
- Soak - Causes hit targets (PvP) to have reduced movement speed and jump height
- Stagger - Causes hit targets (PvP) to stop any active attacks
- Stun - Causes hit targets (PvP and PvE) to be immobilized for a short time
- Vaccum - Causes hit targets to get knocked back towards the attacker
- Basic
- Advanced
- Greater
- Superb
- Extreme
- Ultra
- Hyper
Hats
Hats are your main defensive tool
Right clicking a hat in your inventory will equip it onto your character Hats also have their own unique stats and looks
Hovering over a hat in your inventory will show some information about it

- Name
- Description
- Any associated Traits
Hat traits are special attributes that some hats have that add extra effects to that hat
Possible Hat Traits are as follows
- Ace - Increases effects gained from Combos
- Advantage - Lowers the time in between regenerative ticks
- Aloe Vera - Decreases the effect of Burn
- Anchor - Allows you to stick to walls
- Antidote - Decreases the effect of Poison
- Awaken - Chance to respawn a killed mob
- Blessing - Decreases the effect of Curse
- Blitz - Increases your attack speed
- Blood Donor - Decreased your HP based on damage dealt
- Boost - Increases your movement speed
- Bravery - Decreases the effects of Fear
- Caffeine - Raises your maximum stamina
- Calm - Decreases duration of Shock
- Charm - Increases luck
- Decaf - Lowers your maximum stamina
- Dive - Decreases the effect of Soak
- Drag - Lowers your movement speed
- Enduring - Raises your maximum health
- Exhaust - Takes away stamina based on stamina used on hits
- Focus - Eliminates the effect of Stagger
- Fresh - Lowers cooldowns for potions
- Frenzy - Reduces weapon cooldowns
- Gift - Increases drop rate
- Glutton - Increases weapon cooldowns
- Heavy Foot - Increases your overall gravity
- Hop - Allows you to jump a second time without needing to land first
- Humble - Lowers your DEF
- Infection - Increases damage taken from damaging DOTs
- Invigorate - Gains back stamina based on stamina used on hits
- Launch - Increases your crouch-jump height
- Layers - Decreases the effect of Freeze
- Lift - Increases non-crouching jump height
- Light Foot - decreases your overall gravity
- Patched - Resists Gravity Glitch
- Plant - Allows you to quickly get back to the ground after jumping
- Pressure - Decreases the effect of Bleed
- React - Decreases the effect of Stun
- Reflect - Damage your attacker based on how much you were damaged
- Rookie - Decreases effect gained from Combos
- Rotting - Lowers your maximum health
- Sloth - Decreases your attack speed
- Slug - Decreases mount speed
- Specs - Decreases the effects of Blind
- Spoiled - Increases cooldowns for potions
- Sprain - Decreases non-crouching jump height
- Stampede - Increases mount speed
- Sticky Foot - Lowers your crouch-jump height
- Syphon - Recovers HP based on damage dealt
- Unyielding - Lowers the distance you get knocked back from an attack
Stat Reset
A Stat Reset is a consumable item and when used will remove all of your set stat points and allows you to redistribute them
Obtained from Perry and Box of 40
Inventory Token
This inventory token will add another row of available space to your inventory (8 slots) up to a maximum of 16 rows (128 slots)
Obtained from Perry and as a Donation Gift
Spawnable Merchants
There are 2 spawnable merchants
Public
- Buy smile firework
- Sell unwanted items
- Common drop from monsters
- Buy Oni Mask
- Buy Prize Wheel Lootbox
- Buy Trihard+
- Sell unwanted items
- Very rare drop from monsters
Platforms
Platforms are used to create safe spots or to help access higher ground
There are 3 types of platforms
- Personal
- Bought from the First Stop Shop
- Lasts 5 minutes
- Only able to be used by you
- Public Grass
- Uncommon drop from monsters
- Lasts 10 minutes
- Can be used by anyone
- Public Stone
- Semi rare drop from monsters

- Lasts 30 minutes
- Can be used by anyone
- Right-click it in your invetnory
- Move your mouse to the desired location
- Platform image following your mouse must be green to be placed
- Cannot be near other platforms
- Cannot be near Spawn Lamps
- Cannot be at the Castle Training Grounds nor Castle
- Left-click to place
Travel tokens are used to instantly move you to set locations for the zone the token is for
Obtained from
- Perry
- Uncommon loot from Chests
- Permanent ones can be unlocked from the Circle Shop

Balloons are used to lower your gravity by a little bit per balloon, helping you reach higher areas
Obtained from
- Henry
- Level Rewards
- Permanent one can be unlocked from the Circle Shop
Balloons will pop if you get hit
You can only have a maximum of 3 balloons out at a time
Prize Wheel Tokens
Prize Wheels are a lootbox of sorts with various rewards
There are 3 types
- Prize Wheel Token
- Obtained from Bosses, Box of 40, Prize Wheel Lootbox
- Rewards include
- Gold +5,000/10,000/50,000/100,000
- XP/Credits on next monster kill 200%/300%/500%/1000%
- Drop Rate on next kill x2/x3
- Anniversary Hat
- Premium Prize Wheel Token
- Obtained from Bosses, Box of 40, Prize Wheel Lootbox
- Rewards include
- Gold +50,000/100,000
- XP/Credits on next monster kill 500%/1000%
- Drop Rate on next monster kill x3
- Anniversary Hat
- Ultimate Prize Wheel Token
- Obtained from Box of 40
- Rewards include
- Gold +100,000
- XP/Credits on next monster kill 1000%
- Drop Rate on next monster kill x3
- Only affects Drop Rate and XP/Credit rewards, you keep instant rewards no matter
Drop Rate reward does not stack with the Drop Rate server setting
Drop Rate reward does not stack with effects from Trihard+ nor Drop Rate Boosts
Drop Rate Boosts
Drop Rate Boosts come in 2 types
- Drop Rate Boost
- Obtained from Perry, Box of 40
- Increases your current Drop Rate +1 for your next monster kill
- Stacks with itself, other Drop Rate Boosts, and Drop Rate server setting
- Bigger Drop Rate Boost
- Obtained from Box of 40
- Increases your current Drop Rate +2 for your next monster kill
- Stacks with itself, other Drop Rate Boosts, and Drop Rate server setting
Drop Rate increase not applied to Bosses
Cannot be used with Trihard+
Trihard+
Trihard is a PvE mechanic that gives 3 positives and 3 negatives
The Positives are
- Every level of Trihard gives a 5% increase to your luck
- Every 10 levels of Trihard gives you

- Decreases your current DART cooldown by 10%
- Increases your Drop Rate +1
- Every level of Trihard increases your damage received by 15%
- If you are inactive for 5 minutes, your Trihard level will decrease by 1
- To be considered active, you must attack monsters on the ground level
- Ground level is any solid that you cannot jump through
- Disconnecting by any means or death removes all Trihard levels
Trihard+ can bought from the Private Merchant
Big Death
Big Death is a feature you can use when you reach level 100.
 When used, it resets your level back 1, removes all stat points, and shows a blue roman numeral above your head to signify how many times you've used the item.
It costs 15% of your current gold and credits for its first use, and increases 15% each use up to 100%.
It is obtained through Item Claim upon reaching level 100.
Remix Tokens
Remix Tokens temporarily reset your stats to a random build for 10 minutes
Possible builds are as follows
- Active Build
- At least 40 points into AGI and INT, with the rest of your points random
- Battle Build
- At least 40 points into STR and VIT, with the rest of the points random
- Specialized Build
- One stat chosen at random to have a minimum 60 points in, with the rest of the points random
- Chaotic Build
- One stat chosen at random to have a minimum of 60-70 points in, one other stat chosen at random to have a maxmimum of 1-5 points in, with the rest of the points random
- Balanced Build

- All 4 stats have a minimum of 20, with the rest of the points random
Random Remix Tokens can be obtained through Perry or Box of 40
Hat Fusion Voucher
Hat Fusions enable you to combine two hats together at the cost of 30-40% of the combined stats
Currently obtained from minibosses, bosses and Box of 40
To access the UI, right click the icon in your inventory

- Once open, right click a valid hat in your inventory to add it to the first slot
- This first hat designates the shape of the resulting hat
- With the first hat already selected, select a second hat to fuse with
- This second hat determines the colors used on the shape of the first selected hat
- Click Fuse and Confirm
The stats of the result hat will be 60-70% of the combined total of the main stats, 100% of either negative trait stats, and 60% of either hat's positive traits
You cannot fuse an already fused hat
Weapon Fusion Voucher
Weapon Fusions enable you do buff any non-event weapon
Currently obtained from bosses

To access the UI, right click the icon in your inventory
- Once open, right click the weapon you wish to fuse
- Followed by 2 more of the same weapon, fused or not fused
- Click Fuse and confirm
The random buffs possible are
- Impatient - 25% lower cooldown
- Lightweight - 25% lower stamina cost
- Mighty - 25% higher base damage
- Piercing - Doubles the number of targets hit
- Swift - 25% faster attack speed
Hat Fusion Swapper

This voucher enables you to swap between the selected fused hat and swap the appearance
Currently obtained from any miniboss that's not bugged

To access the UI, right click the icon in your inventory
- Once open, right click any fused hat
- You can see the look it will change to
- Click Swap to complete and confirm
BUG Breaker
Using one of these disables a specific Log Book group from spawning in the BUG Zone for 1 hour
Multiple groups can be disabled at the same time

Right click in your inventory to bring up the UI
- Select a group from the list and confirm to disable that group from spawning
 Text will be displayed to everyone in the BUG Zone if a group is disabled
Public Beach Umbrella
When used, places an umbrella at your location
While near a placed umbrella, your resist to 'Burn' is greatly increased
- Can only be placed in the Desert or Beach
- Lasts for 30 minutes
- Uncommon drop from specific monsters
Warding Totems when used add the highest level of resist to nearly all damaging and movement debuffs
- Does not resist Curse
- Can be placed anywhere
- Lasts 10 minutes
- Only 1 can be placed in the world at a time
- Rare drop from specific monsters
Along with your inventory, you have Storage available to you
You can see the contents of your storage on the 'Storage' tab of your inventory
To access your storage, you will need a Storage Key

- Obtained from Perry
- One-time use
Anything in the Equipment or Consume tab of your inventory can be stored in storage
Lootboxes
Lootboxes can contain various items depending on the box
Various boxes can be obtained from
- First Stop Shop
- Perry
- Henry
- Private Merchant
- Monsters if your health is below 50%
- Special Events
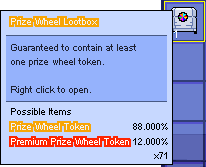
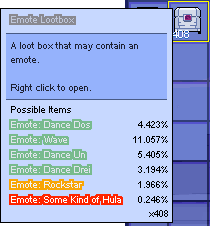
If the sum of all of the percentages on the right side do not equal 100, you may just get a small amount of gold instead of an item
Cosmetics
Cosmetics are changes to visuals of what you and others see from your character
There are multiple visuals that can be changed
If you are able to learn it (if you don't already have it learned), you can right click it to learn it
Once learned, they will be in your 'Cosmetic' tab of your inventory
Right click it in your Cosmetic tab to equip/have the effect
Balloon Skin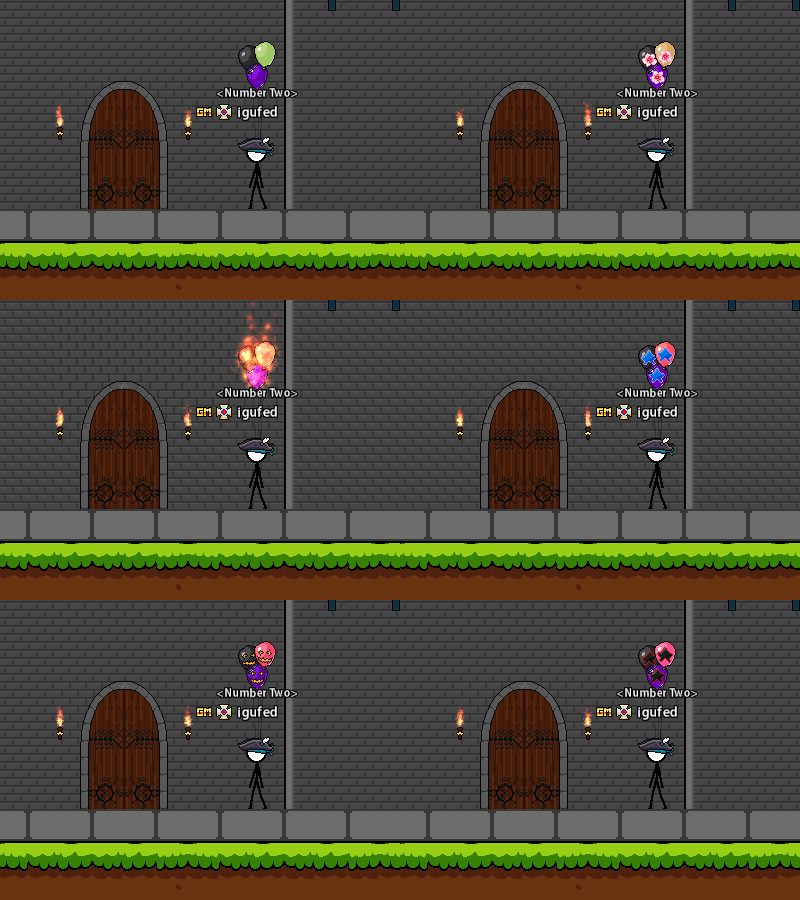
Balloon skins add an effect to your balloons if applicable
Currently obtained from
Emotes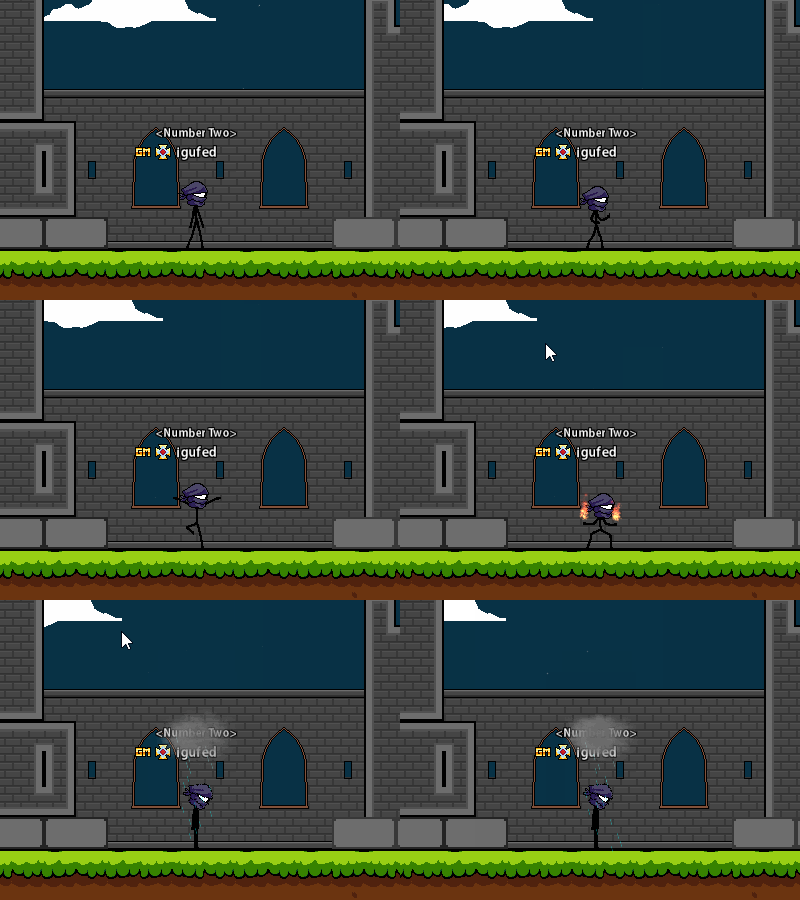
Emotes are a dance or a pose your character can do
Currently obtained from
Finisher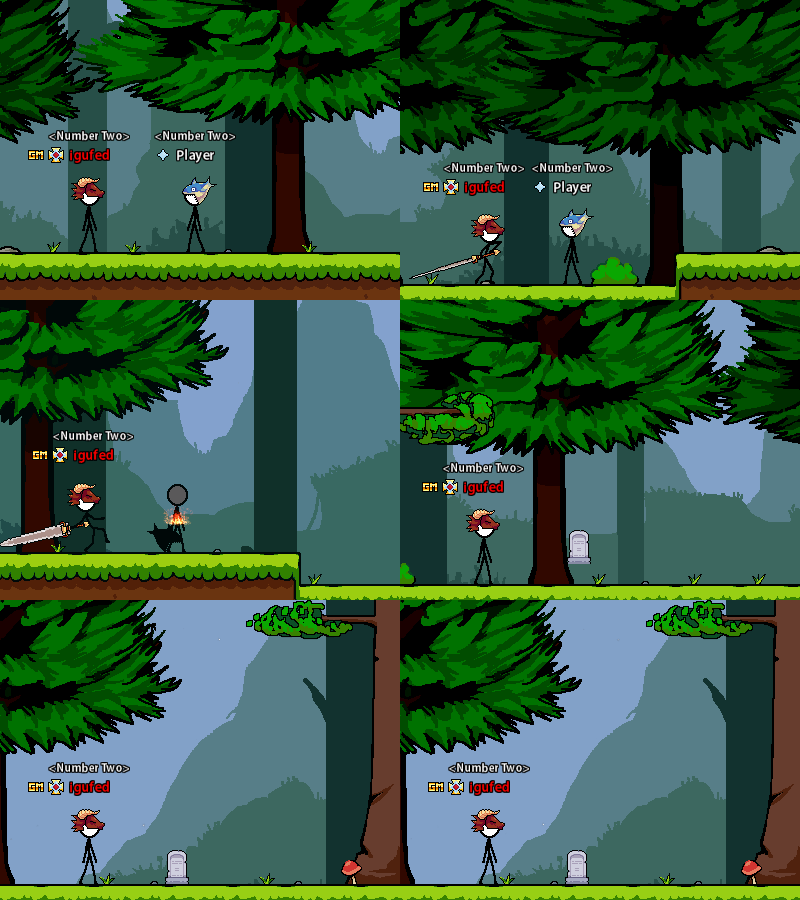
Finisher's add an effect to the people you kill in PvP as well as when you die in PvE
Currently obtained from
Hat Skin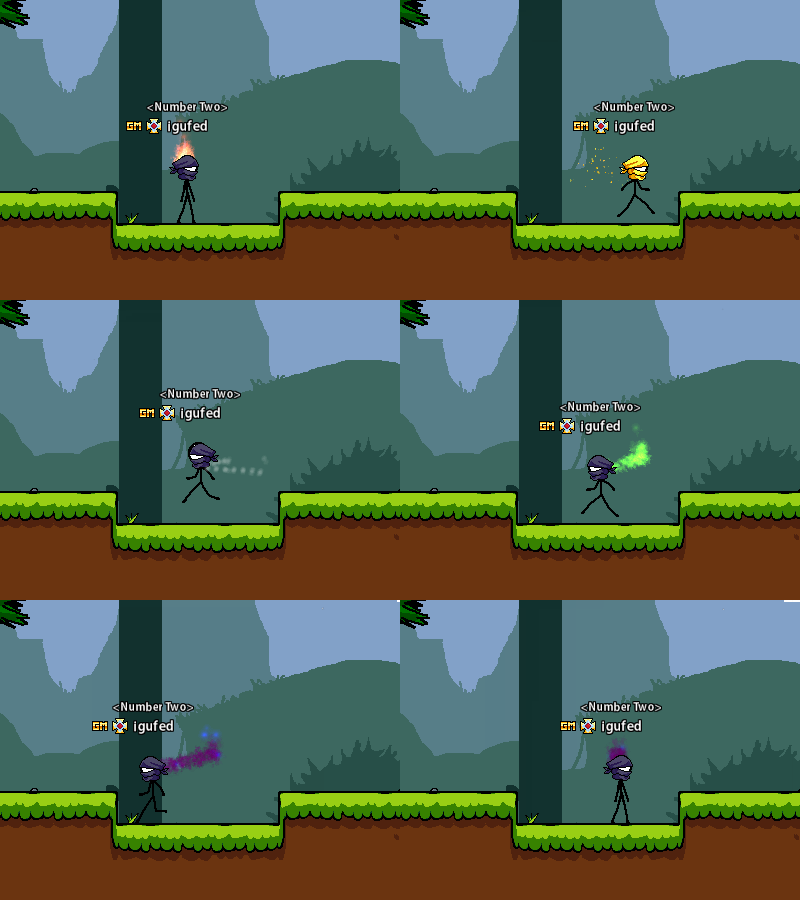
Hat skins add an effect and/or change the appearance of your hats
Currently obtained from
Hit Skin
Hit skins show an effect when you hit a target in both PvE and PvP
Currently obtained from
Mounts
Mounts allow you to regenerate health and stamina while being able to move
Platform Skins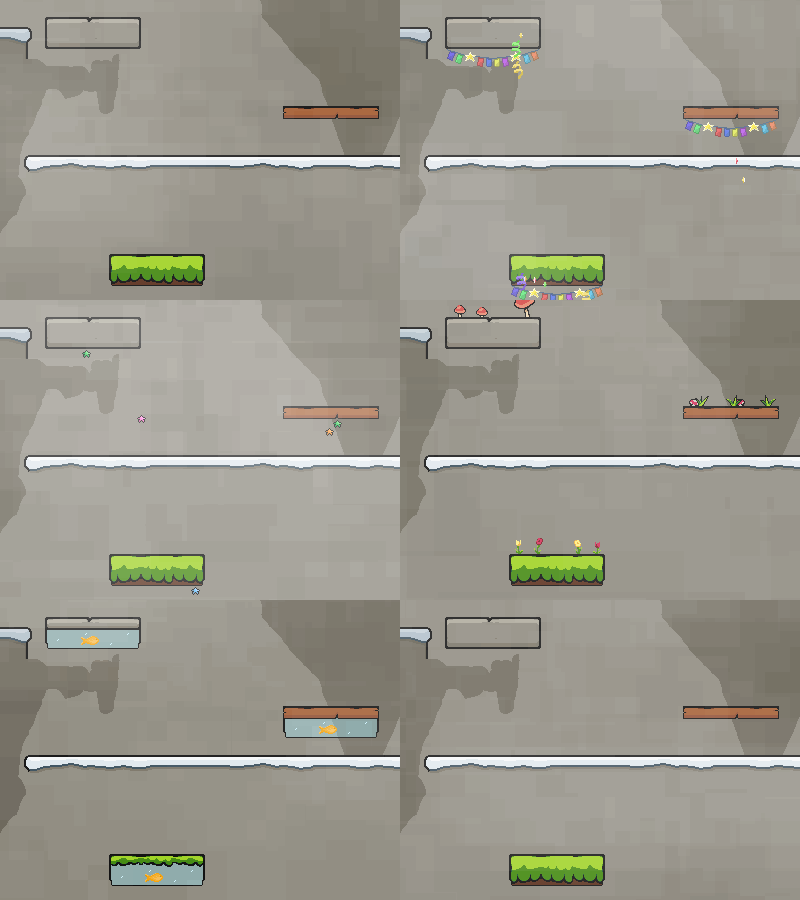
Platform Skins change the appearance of any platforms you place in the world
Currently obtained from
Sit Poses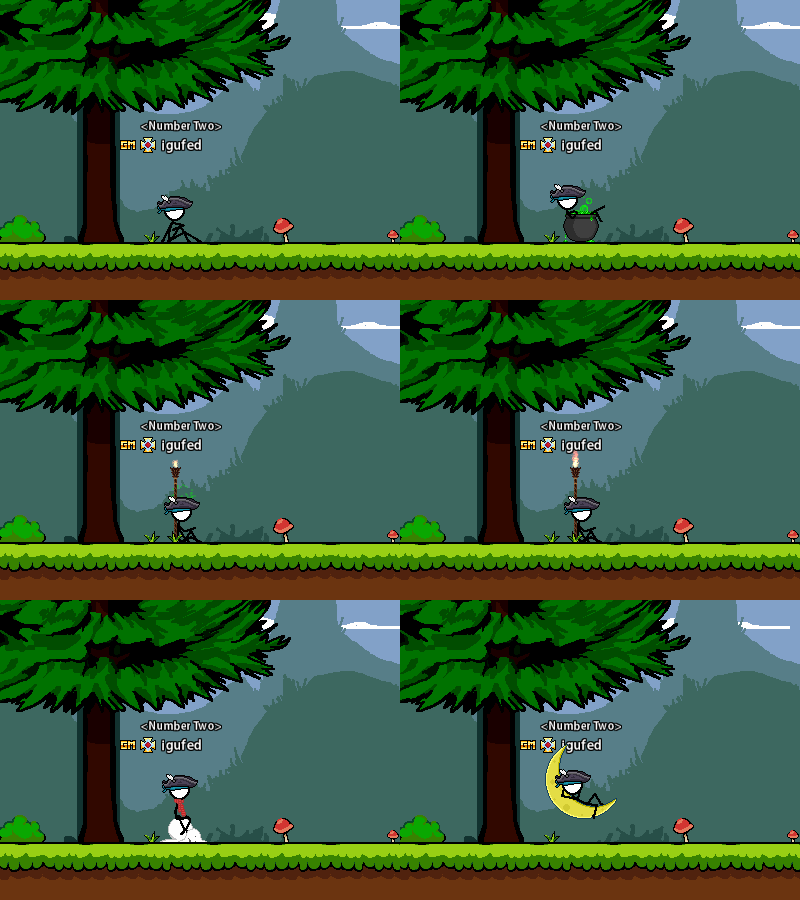
Sit Poses change the appearance of your character while sitting
Currently obtained from
Trail Skin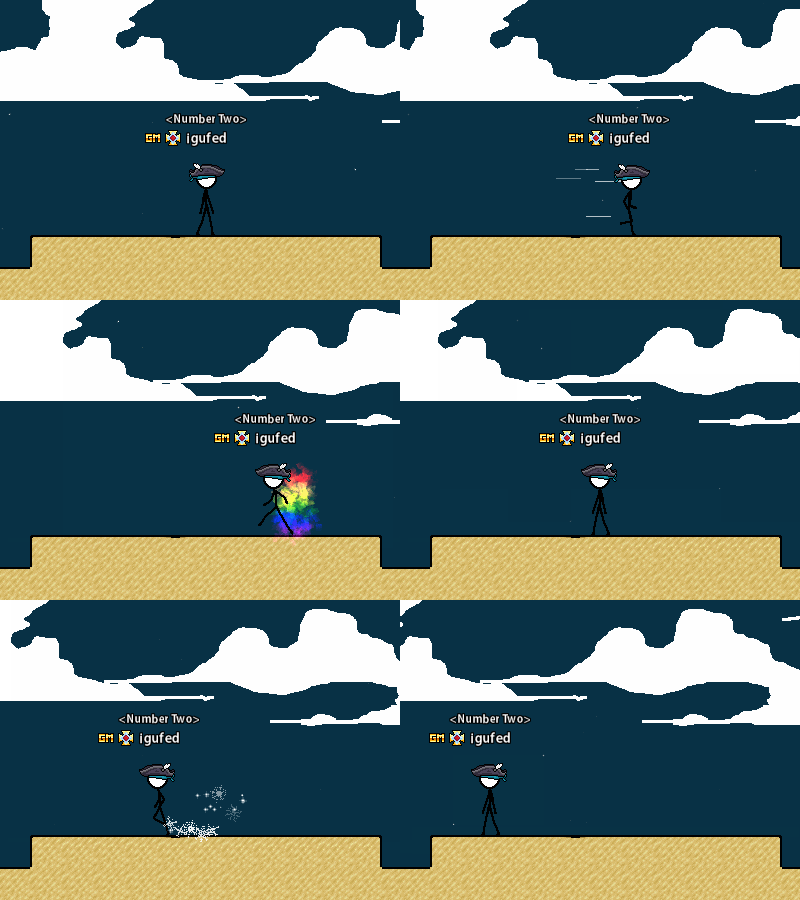
Trail Skins add an effect to your character when it is moving
Currently obtained from
Weapon Effects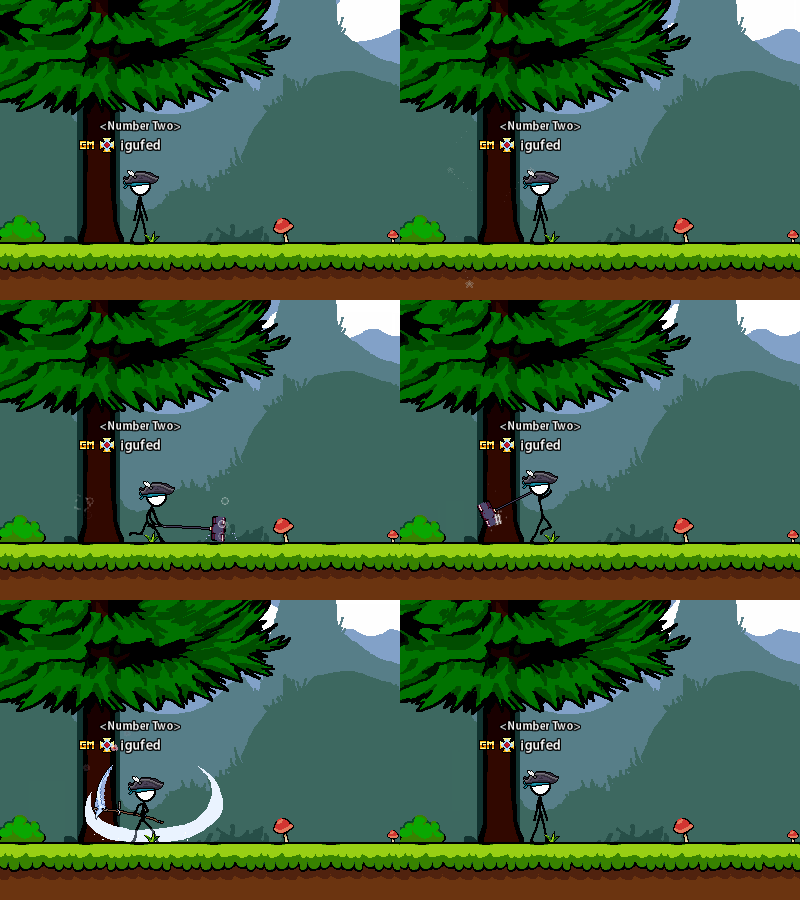
Weapon Effects add an effect to your attack animations
Currently obtained from
Weapon Skins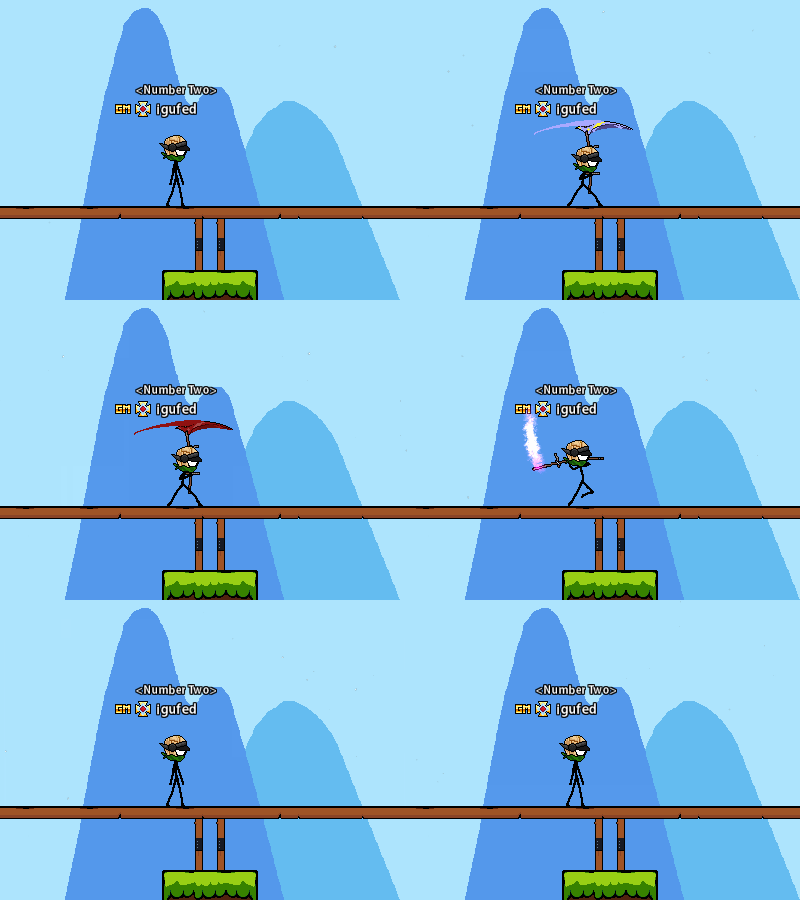
Weapon Skins change the look/colors of your weapons when you attack
Currently obtained from
Cosmetics are changes to visuals of what you and others see from your character
There are multiple visuals that can be changed
- Balloon Skin
- Emotes
- Finisher
- Hat Skin
- Hit Skin
- Mount
- Platform Skin
- Sit Pose
- Trail Skin
- Weapon Effect
- Weapon Skin
If you are able to learn it (if you don't already have it learned), you can right click it to learn it
Once learned, they will be in your 'Cosmetic' tab of your inventory
Right click it in your Cosmetic tab to equip/have the effect
Balloon Skin

Balloon skins add an effect to your balloons if applicable
Currently obtained from
- Henry
- Donation Gift
Emotes

Emotes are a dance or a pose your character can do
Currently obtained from
- Rare drop from monsters
- Emote Lootbox
- Perry
- Donation Gift
Finisher

Finisher's add an effect to the people you kill in PvP as well as when you die in PvE
Currently obtained from
- Finisher Lootbox
- Finisher Lootboxes are currently only given out during player hosted events
Hat Skin

Hat skins add an effect and/or change the appearance of your hats
Currently obtained from
- Perry
- Rogue GM
- First Stop Shop
Hit Skin

Hit skins show an effect when you hit a target in both PvE and PvP
Currently obtained from
- Seasonal events
- Box of 40
- Donation Gift
Mounts

Mounts allow you to regenerate health and stamina while being able to move
- Press 'M' to mount/dismount
- Getting hit by any means also dismounts you
- Very rare chance from specific monsters
- Seasonal events
- Donation Gift
Platform Skins

Platform Skins change the appearance of any platforms you place in the world
Currently obtained from
- Very rare chance from specific monsters
- Donation Gift
Sit Poses

Sit Poses change the appearance of your character while sitting
Currently obtained from
- Seasonal events
- Box of 40
- Donation Gift
Trail Skin

Trail Skins add an effect to your character when it is moving
Currently obtained from
- Seasonal events
- Donation Gift
Weapon Effects

Weapon Effects add an effect to your attack animations
Currently obtained from
- Box of 40
- Donation Gift
Weapon Skins

Weapon Skins change the look/colors of your weapons when you attack
Currently obtained from
- Rare drop from monsters
- Box of 40
- Bosses
- Donation Gift
